Sunday, September 30, 2012

Just Treats! Halloween Candy Box ~ Amazing Mold Putty DT Post

Okay, I totally had another post all ready for today, but I've decided to keep that one for another day and because today is October 1st, we are going with a spooky Halloween Candy Box that I made today because I just wanted to play with my products and have some fun!

If you are anything like me you are out with your child or children on Halloween and there is no one at home to give out candy. This year instead of just leaving the candy in a dish that says "take one," I created this spooky little beauty to hand out the candy for me.

If you want to make this project you will need a skull shaped item to use as your original, a box, a strip of chipboard, a candle, some craft paints, and most importantly, Amazing Mold Putty and Amazing Casting Resin.


I started by choosing one of my husband's beer stein's that is shaped like a pirate skeleton. I used equal parts of "A" and "B" of the Amazing Mold Putty (link above) and kneaded them together until they were a solid color of medium yellow (no white streaks showing at all). Because I was covering such a large area, I did use two good sized balls of putty (each one was a little larger than a golf ball). I probably didn't need quite as much as I used, but I wanted to be sure my surface was covered well.


Once the putty is well mixed I pressed it onto the stein making sure to press our any air bubbles or your mold will have "pit marks" in it.


Once I spread the putty and held the stein up to the light I could see spots where it was too thin for my liking so I just took some of the excess and used it for "patches."

The mold sets up so quickly that I didn't have to wait long - if you are unsure whether or not your mold is "set-up," gently stick your fingernail into it. If your nail goes in and leaves a visible mark, wait a few more minutes. If it feels rubbery and your nail doesn't go in . . . it's ready!


The first thing I noticed was that there is a seam from the stein through the middle of my mold. In an effort to not have to do so much sanding afterwards, I did mix a tiny bit more putty and smoothed it into that line.

Next, I mixed my Amazing Casting Resin (link above). Since I knew I was going to paint it, I just used the white (plus, it was a spur of the moment project and I wanted it to set quickly). I poured the resin in and just before it was too thick to move around, I used my stir stick to put it up onto the sides a bit so I didn't have to have a super thick "mask."


While the skeleton was setting, I found a small shoe box and painted it black with craft paints. I used a strip of chipboard to make a "bridge" to go inside of the shoe box on which the skull and candle would sit. I painted that as well. By the time I finished this, the skull was ready to come out of the mold.


This is what he looked like fresh out of the mold. I plugged in my trusty dremmel and went to work sanding what was left of the seam lines. Other than that, he was perfect! I added a few different coats of paint (I can never leave well enough alone - lol) and voila . . .!


Next, I glued the skull to the candle and then glued them both onto the "bridge." Now my candy box is ready to leave on the door step on Halloween night.


I can't even tell you how quickly this project came together. With Amazing Crafting Products the process is so fast and simple you really can sit down to "play" and come away with a finished project in as little as a half an hour (okay, with my must add layer upon layer of paint it took me a whole hour). Click on this link to visit the Amazing Crafting Products website and order your putty and resin and get started on those Halloween projects!

Thanks for looking at my scary candy box.

~ Make Today Count

Wendy
You can the AMP blog at http://amazingmoldputty.blogspot.com/

Thursday, September 20, 2012

Halloween Treat Bags (Boxes)


Aren't these cute?  My nephew spent the night with us the other night and to keep two 8 year olds busy, I had them make treat bags for my nephew's school class.  These were fun and easy.

We started with empty paper towel rolls.


We cut them in lengths of 3.5", stapled the bottom and then covered front and back with Halloween patterned paper (print on the front and solid on the back).  After filling them with the treat, that we punched a hole in the top, added a paperclip with a bat tag and then finished it off with ribbon to tie it closed.  What do you think?  Cute eh?  It was fun, fast and easy.


~ Make Today Count
Wendy

Saturday, September 15, 2012

Wedding Cake Mini Album ~ Robin's Nest DT Project


This is a project I made for a friend's wedding pictures.  It was a birthday gift to her so I've been holding on to it until I could give it to her.  But now that I have I can share it with you!  I have to give credit for the outside cake portion to sacrafters on youtube.  She has a great tutorial on how she made her version of a wedding cake for a mini album as well as a ton of other great tutorials.  Be sure to check her out. 

I tweaked her design just a bit to make it my way and I absolutely loooove the way it came out!  Here is one picture of the inside before I tell you how I made it.


Isn't it cute?!  I know right?  Okay, so my only problem was that I got so excited after I started making it, I forgot to keep taking pictures!  I had a lot of fun with this, really.


So the first thing I did was choose my papers and cut them in three sizes (picture above).  I chose Glitter Black and White Swirl, and Glitter White on White cardstocks.  These are the same papers I used ink on in an earlier project and made it look totally old world.  This paper is so versatile, but for wedding for formal events, you don't have to do a thing to them and they are still fabulous!  I can even see them paired with red for great Christmas projects or with orange for Halloween.  Again, the possibilities are endless.
 
 The circle sizes are 4, 5.5 and 6 inches, but you could really do any size you need to accommodate your mini.  I then cut coordinating papers in strips 1.5, 2 and 3 inches in depth (I had to cut two lengths of each strip to make it long enough to go all the way around.
 
Then, cut three pieces of cardboard (picture below) to fit your circles (I used a shipping box for good thick card board) You will need a second circle like the bigger one later so you might want to cut that one out now too.  Cover the top side of your circles and the bottom side of your largest circle.  I painted the edges first, but it turned out that between the side pieces and the trim you wouldn't see any raw cardboard anyway, it was a needless step.  Once you have your circles covered, stack them on top of each other (centered) and pierce a small hole all the way through the stack of 3.


Next (picture below) I used my hot glue gun and added the strips to each circle to make a "layer" for my cake.  And this . . . is where I stopped taking photos.  The cake started coming together so quickly that I just got carried away in the fun of it all.  So below this picture I will give the rest of my instructions and you picture it in your head . .. okay?


Once you have each layer completed, you will need some heavy gauge wire or some coated wire that's pretty heavy duty (a long enough piece to double and go from the top of the cake to the bottom).  With the wire doubled, start threading your layers on, starting with the largest layer on the bottom.  When you get the top one on you want to leave a loop (where it's folded in half) sticking out the top (about 1/4" sticking out).  Under the bottom layer, twist the wire and then spread it out so it "catches."  You should now be able to pick up your cake by the top loop.  To hide the wire I put a homemade flower in the bottom layer and of course the top I covered with flowers and a couple of stick pins.  I then added a bit of black ribbon tied to the "loop" of wire.  This give you a handle to open and close the box rather than picking it up by one of the layers.  If you take a look at the next picture, you can see the inside of the box.  Now is when you need that extra circle you cut from the cardboard.  Start by trimming about 1/16th of an inch all the way around the circle.  Then cover it in white cardstock.  You will basically create another cake layer in all white, except that it will be upside down.  Because you trimmed that 1/16th of an inch off it will fit nicely inside the "lid."  Be sure you don't trim it down too much or your lid will not fit snugly.  I also added a bit of lace hanging off so that if the bottom gets stuck inside the lid you have a way to pull it out without destroying your cake.  After that I decorated my cake!

 
Next you will see pictures of the mini album I fit inside.  Be careful.  My album got a little too fat and my lid wouldn't go all the way to the bottom of my box so I had to add a bit of lace at the bottom to hide that fact.  So, before you start creating, decide if you can keep your mini . . . well mini; or if you want to make your layers taller.
 
For the album I used the same papers (Glitter Black and White Swirl, and Glitter White on White cardstocks plus Glitter Silver on Black cardstock along with white cardstock.  Each of the six pages of the album are pockets with a tag in each so there is room for plenty of wedding photos.  Below you can check out the pictures of the top and of all of the pages of the album. 


Thank you so much for taking a look at my project.  I can't say enough about this glitter paper, especially for wedding projects.  Be sure to check out the Robin's Nest website for these and other fabulous papers!


~ Make Today Count
Wendy

Tuesday, September 11, 2012

Remembering Kathryn L. LaBorie ~ 9/11 Tribute

Another blogger I follow posted a tribute this morning that touched me.  She has chosen to participate in Project 2996.  I am going to follow her lead. 


I have chosen to pay tribute Kathryn L. LaBorie, a 44 year old Rhode Island, flight attendant, wife, daughter and sister, who was on the plane that hit the south tower on that fateful day.  Today. . . Kathryn is not just a number on list of victims.  Today I remember Kathryn L. LaBorie whose life was cut short.

~ Make Today Count
Wendy

Monday, September 10, 2012

My South Dakota Cowboy - Deadwood Photos

Okay, decisions, decisions, decisions . . .

I am having a picture of my younger son transferred to canvas (we did one with my older son when he was little) and I am having a heck of a time deciding which one . . . We took these pictures in Deadwood during our summer roadtrip.


Isn't he stinkin' cute?!?

~Make Today Count
Wendy

Thursday, September 6, 2012

I Made the Amazing Mold Putty Design Team!!!!


Just wanted to announce that I made the design team for Amazing Mold Putty!!  I am uber excited.  I can't wait to get my hands on more putty (um . .. I've had so much fun with mine it's about gone) and resin to create some super fun things.  My Hobby Lobby has trouble keeping it in stock (but they have an Amazing website and discounts from time to time if you watch their blog (click on the logo in this post or on my blog itself to go to there).  My mind is already starting to think about school projects, teacher gifts, etc.  Sooooo WHOOP WHOOP!

~ Make Today Count
Wendy

Wednesday, September 5, 2012

School Days Accordian File Mini Album Class

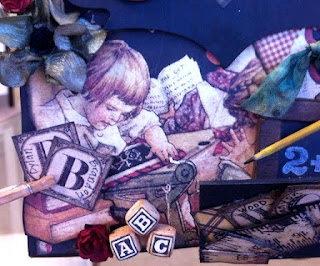
Here is a sneak peek at my class project for September 29, 2012, at Timeless Treasures in Rancho Santa Margarita.  If you live in the area and want to attend, please give them a call (949-888-7151) or stop in and sign-up.  This class will be limited because I have limited quantity of some of the embellishments.  Don't miss out.  My picture only shows a portion  . . .


Thanks for checking out my project!

~ Make Today Count
Wendy

Tuesday, September 4, 2012

Amazing Mold Putty Design Team Call


This year was my first year to go to CHA and I was amazed at all the fun and wonderful things I saw there.  At one booth I found and purchased some Amazing Mold Putty and Casting Resin.


I had absolutely no idea what I was in for!  I have had so much fun since I started "playing" with these products.  The first thing I ever tried was an anniversary gift for my husband. Where I made a mold of a bronze mermaid bottle opener, a brooch, and a metal flower.  I used these to create a faux tarnished bronze box (I am posting a picture, to see the "how-to" instructions go to May, 2011 on this blog and you will be able to find it).
 

I was so impressed with what I was able to create and couldn't help thinking how endless the possibilities were.  I started playing further. . .
 
One thing I really hate is when I only have one of something and I'm afraid to use it because I might "need" it again on some other project later.  For example, my husband collects odd, antique keys (I do a lot of cowboy scrapbooking with pictures of my son).  For each key I only get one, but with Amazing Mold Putty and Casting Resin, I can have as many as I want!  Check out these keys . . . can you tell which one is the original?


Now, not only can I make duplicates for myself, but if I want to make them for a class I'm teaching at my local scrapbook store I CAN!  This opens a ton of doors since there are always items I want to use but there is no way I can get 5 or 10 of them for a class because they are one-of-a-kind items I've purchased at a thrift shop or antique shop.  Because my style lends itself more to these one-of-a-kind items, I am wondering now what I ever did before I found these products - lol!

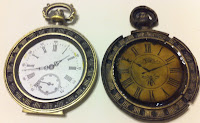
In the picture below, you can definitely tell which pocket watch is the original, but which one do you like better?  Me?  I like the one I made.  I was able to paint and distress the resin version in a way I could never do with the real metal.  I was able to choose my watch face and ink it up too. I absolutely love this and am saving it to use on something for my father.


The next picture is of all the items I made on this particular day.  Check out the button.  The frame is the perfect size for a pack of tiny cameos I purchased.  I now can "set" them in any color frame I choose, i.e. gold, copper, bronze, silver . . . I am limited only by the colors I have on hand.


In the pictures below you can see the process (ignore the messy craft mat - again, I am messy when I craft):


I hope you derive a little inspiration from this and that it gives you just a taste of what you can do.  All you need is a little imagination . . . and some Amazing Mold Putty and Resin! Check out their blog here Amazing Mold Putty Blog and their product website here Amazing Crafting Products.

~ Make Today Count
Wendy


http://amazingmoldputty.blogspot.com/