
Monday, December 5, 2011
It's Beginning to Look a Lot Like Christmas!
We decorated our tree last night. I always love to sit and look at it afterwards . . . It's not huge since we don't have a very big space for it, but it's just right!

Tuesday, November 29, 2011
Graphic 45 Steampunk Suitcase
So, I wanted to try something a little different than my usual style, so I created it this steampunk suitcase using an Este Lauder purchase with purchase travel case. I like how it turned out . . . not exactly as it was in my mind, but close.
 I started with 7 Gypsies tissue paper and added some Maya Road trim around the outside edge. The next layer was the flowers - the four roses are Recollections; 3 cream roses that I inked and glimmer misted up and the last was a red that I glimmer misted a bit. The flower with the bling in the center made using a cream organza type synthetic fabric (Walmart remnant) using Leanne's (luvleescrappin on youtube) technique and the Tim Holtz Tattered Florals Sizzix die. When I was finished I used the Tim Holtz reinkers to make a dye and then used a little black soot on the edges (it's kind of hard to see the different color tones in the picture). After the flowers I added in the Recollections leaves which I have inked up also. I I embellished with a Tim Holtz birdcage Sizzix die which I've embossed with the Tim Holtz Vintage Photo embossing powder to give a rusted metal look. I attached some metal charms at the top of birdcage and added some bling at the bottom. Just over the birdcage and under the flowers I tucked a Graphic 45 Steampunk Debutante woman which I fussy cut, inked and highlighted with Glossy Accents. I added a metal timepiece at her bustle which kind of fell to the side in the picture (it's supposed to hang down from the bustle). I tucked in a couple of metal gears and some stick pins I made with crystals and beads; and finished it off with a glittered butterfly I bought at Michaels in the Christmas decorations (I just added a body made from crystals and beads). That's it! It was fun to make and I hope you enjoy.
Wendy

Wendy
Tuesday, November 15, 2011
Random Act of Kindness
I was the recipient of a Random Act of Kindness (RAK) this morning for the first time ever!! Okay, wait, I should clarify . . . first time ever to happen out of the blue from a stranger. I was in the line at McDonald's this morning and the person in front of me paid for my order! I was having a bad morning and was in a real mood and it was totally transformed by this one small act. So, to that person out there whoever you are . . . THANK YOU! Thank you for making my day better and reminding me to continue with Random Acts of Kindness to others.
Wendy
Wendy
Monday, November 14, 2011
Stack of Old Letters Secret Box
I found this tutorial on Leanne's youtube site (again) here is a link to her video http://www.youtube.com/user/Luvleescrappin#p/u/8/YChXxeV2eGo. She got the idea from another youtuber who got it from this youtuber's video http://youtu.be/m2kArL5ydBw. I really like how Leanne changed it up and added the photo spot on the top. The pictures below are just a prototype (I never use good products on the first try, knowing I will mess it up or find things I want to change) so don't judge it too harshly - lol. The idea is really cute though. I think I might come up with one for Valentines Day and call it "Love Letters." So here are my pictures of the rough draft . . .


As you can see, I didn't think much about where I was going to put the ribbon . . . need to change that for the next go around.

 If you haven't been checking out youtube videos for scrapbook samples, you are really missing out. There are so many talented ladies (and a few men - lol) who have some great tutorials and happily share their work.
Have a great week!
Wendy


Have a great week!
Wendy
Thursday, November 3, 2011
Fabric Owl using a Sizzix Die

Class Halloween Party Treat Bags
We had our class party and my treat bags were a hit (thanks to Valerie, one of the room moms, I had more to stuff inside of them and some cute pencils to attach to the back). My husband told me I was putting too much time into making these things; and, I have to say, after several hours of die cutting and I still wasn't finished, I was almost at the point of agreeing with him . . . but the look on my son's face (not to mention all of the other children in his class) when I walked in with my tray of bags, was worth every moment I spent. People say that 2nd graders don't appreciate something like that, but when you have little girls asking you questions about how you did certain things (whether you drew it or stamped it, etc.) and children who hug you and tell you "thank you" for taking the time to make treats for them, you know it's not true! Here are some pictures of the finished product:

 Here is a great picture of the "aftermath" . . .
 Do you think he's had too much candy already?!?


Monday, October 31, 2011
Tuesday, October 25, 2011
Flower Made from Satin Using the Tim Holtz Tattered Florals Die
Okay, Leanne (Luvlee Scrappin) http://luvleescrappin.blogspot.com/ has a youtube tutorial on how to make this flower . . .that's where I learned it.
I just got my Tattered Florals Die in the mail yesterday (yay for ebay) and had to try it out. You have to watch her tutorial to get the full "how-to," but very basically, you cut 5 of the large flowers and 1 small and then you heat the petals over a flame to "curl" them and seal the edges. You set aside one of the large flowers and work with the other four. Using a glue gun and a felt disc about 1" in diameter, you fold each of the four flowers in fourths and glue them around the felt disc. Then glue the entire disc to the fourth large flower, situating it so that the petals fill-in any gaps. Then place the smaller flower on the top and adhere some sort of centerpiece (Leanne has these really pretty ones but I don't, so I just used a silver button I had).
If you don't want to make these yourself, I believe you can purchase them directly from Leanne through her shop http://www.zibbet.com/luvleescrappin. She has perfected the technique. I would never have thought to try this if not for her tutorials, so just want to give credit where credit is due.
Here's my flower:
 Pretty for a first try huh? Hint: I bought satin remnants at Joann's for half price . . . perfect for this type of project.
I just got my Tattered Florals Die in the mail yesterday (yay for ebay) and had to try it out. You have to watch her tutorial to get the full "how-to," but very basically, you cut 5 of the large flowers and 1 small and then you heat the petals over a flame to "curl" them and seal the edges. You set aside one of the large flowers and work with the other four. Using a glue gun and a felt disc about 1" in diameter, you fold each of the four flowers in fourths and glue them around the felt disc. Then glue the entire disc to the fourth large flower, situating it so that the petals fill-in any gaps. Then place the smaller flower on the top and adhere some sort of centerpiece (Leanne has these really pretty ones but I don't, so I just used a silver button I had).
If you don't want to make these yourself, I believe you can purchase them directly from Leanne through her shop http://www.zibbet.com/luvleescrappin. She has perfected the technique. I would never have thought to try this if not for her tutorials, so just want to give credit where credit is due.
Here's my flower:

Monday, October 24, 2011
Sizzix Die Storage Solution and Die Cut Station
Since I'm not yet finished with my Road Trip 2011 scrapbook, I thought today I would post about my Sizzix storage solution. Yesterday I decided I was fed up with having to go into the closet, search through the dies in a drawer, take it out of the plastic package, etc. to use it . . . and then put it all back away the same way. But, since my scrapbook room is in my closet, I don't have many choices (I am maxed out with supplies but keep buying them anyway - don't tell me you scrapbookers don't know exactly what I'm talking about!). So . . . I have a DVD shelf that I was using for scrapbooks and miscellaneous that is now my Sizzix Shelf, and I looooove it! Now I can just grab what I need and put it right back with no hassle; but it's still organized and neat (which is a must).
Here it is:
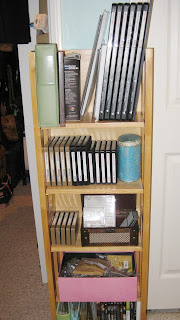 The extra long dies are on the top shelf (with room for more!) since they are too tall for the other shelves, but the Bigz dies and the original dies are on the second shelf and my Tim Holtz On the Edge dies are on the third shelf, along with a treasure chest which holds my Texture Fades and Embossing Folders perfectly. Once I cleaned out the DVD shelves, there was even room on the fourth shelf for a box of all of the charms I've been collecting. The way I see it, I have room for at least 5 or 6 more of each type of die!
The next picture is my die cut station. My friend Dawn was getting rid of this rolling cart which is supposed to have 12x12 hanging file folders on the left side. As you can see, I have placed boards (I need to get to the hardware store and get one piece of wood the right size though) across the top and put my Tim Holtz stamps in a basket on the top along with my Big Shot Sizzix Machine. Below on the left I have various photo boxes housing different embellishments. On the right, the top two shelves are filled with the punches I used most often. Below that are misc. items including my Martha Stewart scoring board (I love this thing - if you don't have one let me recommend it wholeheartedly). Anyway, This pulls out of the closet and right in front of the new Sizzix Die Shelf and everything is at my fingertips.

As always, thanks for looking!
Wendy
Here it is:

The next picture is my die cut station. My friend Dawn was getting rid of this rolling cart which is supposed to have 12x12 hanging file folders on the left side. As you can see, I have placed boards (I need to get to the hardware store and get one piece of wood the right size though) across the top and put my Tim Holtz stamps in a basket on the top along with my Big Shot Sizzix Machine. Below on the left I have various photo boxes housing different embellishments. On the right, the top two shelves are filled with the punches I used most often. Below that are misc. items including my Martha Stewart scoring board (I love this thing - if you don't have one let me recommend it wholeheartedly). Anyway, This pulls out of the closet and right in front of the new Sizzix Die Shelf and everything is at my fingertips.

As always, thanks for looking!
Wendy
Wednesday, October 19, 2011
Finished Dress Form (Tim Holtz Sizzix Die) Wedding Dress
Okay, below is the finished dress from, but before I forget, here is the link to the blog where I got the idea to link two die cuts together to make it stand so pretty (look around her blog, she has sooo many fabulous things to see)! http://keeponscrappin.blogspot.com/
I gave this to my friend as a congratulations on her engagement with a disclaimer that it ". . . is completely
useless, has no purpose other than to look pretty, but here it is . . . " I think she still liked it . . .Sheri?


Monday, October 17, 2011
Dog (Yorkie) Mini Chipboard Album with Acrylic Cover
Okay, I know I need to post the pictures of the finished Tim Holtz wedding dress form, but I need to get the pics off of the big camera and onto the computer *heavy sigh* - so instead, I'm going to post picture of the mini chipboard (6x6) I made for a friend. I'm sad that the paper is a discountinued line so I can't even recreate it, but hopefully it will give you a few ideas for a dog album if you are looking to create one. So, here it is:


 This was a fairly simple album without a ton of embellishments, but I think it came out cute anyway. Thanks for looking.
Wendy


Wendy
Friday, October 14, 2011
My Album Showcased on Another Blog
Hi guys, check out the blog http://scrapbook-crazy.blogspot.com. There are a ton of great mini albums and tutorials! Yesterday they showcased my Halloween skeleton tag mini album.
Have a great weekend all,
Wendy
Have a great weekend all,
Wendy
Thursday, October 13, 2011
Sneak Peak at Tim Holtz Dress Form Die Cut Wedding Dress
Okay, so I have this friend who is getting married and while I know it's a second marriage and they probably won't make a big deal of it, I wanted to make her something special (kind of a congratulations on your engagement). Yes Sheri, I'm talking about you, so don't scroll down!
I have seen so many over-the-top gorgeous or funky dress form projects by so many different talented artists and am inspired by all of them, but this one I wanted something different. As I was going from blog to blog looking at the different ones trying to decide what I could do that was different and it hit me . . . duh! . . . a wedding dress. And, I am going to do it as a standing form by attaching two dress forms at the top so it stands like a tent (I got this idea from a blog by a very talented woman named Bona - I will link her blog so she gets credit for her idea when I post the final project).
What I am the most excited about I think is the veil. I didn't get a good enough picture of this, so I will make sure I get some good ones when I post the finished project. For the veil, I was going to take wire and make a mini crown with some white beads, etc. and then attach some tulle to it, but then . . . SCORE! I was looking through my beads and misc. jewelry findings and I found this (I have no idea what it's called or why I have it but it's perfect!).


 Thanks for allowing me to share my creation with you.
Wendy
I have seen so many over-the-top gorgeous or funky dress form projects by so many different talented artists and am inspired by all of them, but this one I wanted something different. As I was going from blog to blog looking at the different ones trying to decide what I could do that was different and it hit me . . . duh! . . . a wedding dress. And, I am going to do it as a standing form by attaching two dress forms at the top so it stands like a tent (I got this idea from a blog by a very talented woman named Bona - I will link her blog so she gets credit for her idea when I post the final project).
What I am the most excited about I think is the veil. I didn't get a good enough picture of this, so I will make sure I get some good ones when I post the finished project. For the veil, I was going to take wire and make a mini crown with some white beads, etc. and then attach some tulle to it, but then . . . SCORE! I was looking through my beads and misc. jewelry findings and I found this (I have no idea what it's called or why I have it but it's perfect!).
I think they are for earrings, but now it's a veil. I took my pliers and bent the single one up and bent the three down. I then cut strips of tulle which I looped through each of the set of three loops. I then trimmed the bottom (slightly curved) to make it even. Then on the one loop that was bent up, I attached a large rhinestone with a glue dot and the used glue dots to attach two more on each side of the large one, descending in size. I then coated the back of the rhinestones with glue (in such a way that when they dried they were like a single unit) and set it to dry. The last step on the veil was to glue some small rhinestones to the tulle to finish it off. I think it turned out sooo pretty! This quick picture doesn't do it justice because it is so much cuter in person.

For the dress form, I cut two from chipboard using the Tim Holtz Alternations Die and then cut 4 more dress forms from patterned paper (if you are going to do this, make sure you place your paper 2 pieces face down and 2 pieces face up so they line up cleanly on the dress forms). After I glued the paper dress forms to the front and back of the chipboard dress forms, I painted them with a creamy white paint wash (1 part paint and 2 parts water (and an extra part of Martha Stewart white glitter). This just softens up the patterned paper a bit. Then I coated the top part of the dress form I want to be the front and the stand (the only parts that will show) with Ranger Distress clear Crackle Paint (Rock Candy). When it dried I applied a 2nd coat. When it was dry I used my paint wash and went over the crackle finish and then wiped it clean with a baby wipe (I would probably tint my paint wash with some color if I did this again so it shows up more, but the effect I got is really soft and pretty). Because there is the rock candy in the crackle paint and the glitter in my paint wash, there is a bit of pretty pearl shimmer that you can't quite see in the picture (at the end of this post).
The last thing I did was die cut some mini flowers (5 flowers) from scraps of the satin I am going to use for the dress. I then heated the flowers over a candle to curl the edges - I learned this technique from Leanne (Luvlee Scrappin blog); make sure to check out her blog and her youtube videos because she has some GREAT tutorials - and seal the satin so it doesn't fray. This technique was really hard to do with these tiny flowers, but I sure like how it turned out. You really need to see Leanne's youtube video for complete instructions on how to do this - I will post a link to it with my finished project. When the flower was finished I added a little stickles and silver Martha Stewart glitter and then layered on a metal flower and mini pearl brad (note: I used pliers to bend the petals of the metal flower down slightly to show more of my fabric flower).
Okay, this so-called "sneak peak" was way more verbose than I intended (sorry). Here are the last pictures (again, sorry they are not great images):


Wendy
Tuesday, October 11, 2011
Halloween Party Goodie Bags
Okay, this is just my prototype. That being said, below is the goodie bag I've designed for my son's second grade class this year. Looking at it I can already see that the black topper needs to be a little shorter and my spider webs more pronounced, but here's what I did:
The Bag:
I started with the orange mini lunch bags (you can get them at Michaels in a pack of 16 for a little over $3). I used a Martha Stewart fence border punch (40% off this week) and then just trimmed it off, inked it and glued it on the bag. For the crow and bat images I used Martha Stewart Halloween stamps (also purchased at Michaels - 40% off this week). I stamped the crow on cardstock, glittered it with Martha Stewart fine black glitter (there seems to be a Martha Stewart theme here, but I didn't plan it that way!) and then cut it out and set him on the fence with a 3D foam adhesive dot.
The Topper:
The "topper" is black cardstock on which I used the Fiskars border punch "Threading Water." I stamped spider webs on it with embossing ink and embossed with clear embossing powder (although I think I will use the thick embossing powder or maybe pearl on the next one so it shows up better). I tied a small black bow off to the side since my border holes were not centered. I then folded the topper and stapled it to the bag.
I then cut a scalloped circle from white cardstock using my sizzix circle frame (Michaels purchase with 50% coupon!). I inked the scalloped edges, stamped the bat image, folded it (not right in the center or the top of the image would be cut off) and glued it onto the center of the topper. I then used Diamond Ranger Stickles glitter glue to draw attention to the "Happy Halloween" banner.
That's it! Only 32 more to go . . .
 (Sorry this picture is crooked and not well lit - I took it with my phone late last night).
The Bag:
I started with the orange mini lunch bags (you can get them at Michaels in a pack of 16 for a little over $3). I used a Martha Stewart fence border punch (40% off this week) and then just trimmed it off, inked it and glued it on the bag. For the crow and bat images I used Martha Stewart Halloween stamps (also purchased at Michaels - 40% off this week). I stamped the crow on cardstock, glittered it with Martha Stewart fine black glitter (there seems to be a Martha Stewart theme here, but I didn't plan it that way!) and then cut it out and set him on the fence with a 3D foam adhesive dot.
The Topper:
The "topper" is black cardstock on which I used the Fiskars border punch "Threading Water." I stamped spider webs on it with embossing ink and embossed with clear embossing powder (although I think I will use the thick embossing powder or maybe pearl on the next one so it shows up better). I tied a small black bow off to the side since my border holes were not centered. I then folded the topper and stapled it to the bag.
I then cut a scalloped circle from white cardstock using my sizzix circle frame (Michaels purchase with 50% coupon!). I inked the scalloped edges, stamped the bat image, folded it (not right in the center or the top of the image would be cut off) and glued it onto the center of the topper. I then used Diamond Ranger Stickles glitter glue to draw attention to the "Happy Halloween" banner.
That's it! Only 32 more to go . . .

Thursday, October 6, 2011
Halloween Skeleton Mini Tag Album in Treat Box
Okay, this one is a bit macabre for me, but it's a hostess / thank you gift for a Halloween party (Michelle, if you somehow get to my blog, don't look!). We've never really done Halloween, but my youngest dresses up every day of the week, so Halloween just kind of started happening in our house once he was old enough to catch on . . .
This is a mini tag album (I only embellished the front of the tag album and the front of the treat box), but for dark and weird, it's kind of "cute" if you will.
I started by using one of 4 treat boxes from a package I bought at the local 99 cent store. I inked it up with Ranger distress inks and alcohol inks (it's a glossy surface so the alcohol inks blend with the distress inks and make them stick better). I took a piece of scrap paper and tucked it inside the box before I unfolded it and traced around the top part of it to make a template. I then cut some textured card stock and lined the inside of the "lid" portion (see the last picture below to catch a glimpse of the lining to see what I mean).
I then took five regular, manilla shipping tags from the office supply store and cropped about 1/4 inch off the bottom because they wouldn't fit in the box (even diagonally) without cropping them. I covered the tags (front and back) with paper from the Recollections Halloween paper pad. Next step of course was to "dirty" them up with distress inks (Ranger inks - Walnut, Vintage Photo and Black Soot). I then used plain white hole reinforcers from the office supply store that I inked up to give the holes a finished look. I used a common, shiny, silver bookbinding ring that I colored with a black permanent marker and then "mucked up" with some gold paint to give it a vintage, dirty look. So when I got that far I wasn't sure where I wanted to take it. Here's what I was staring at . . .

At this point, for my front (cover) tag I added a torn piece of paper (the glitter chandeliers from tag #2) and some lace that I glimmer misted and inked with Ranger Black Soot and pleated onto the tag with a glue gun. I also cut a small piece of the diamond patterned paper and added it on to the side. I die cut a jack-o-lantern and dirtied it up really well because the orange I used was too bright. So as I'm looking at it, I liked the box, I liked the paper, but I didn't like the jack-o-lantern. So I scrapped the jack-o-lantern altogether and ended up with this:


What I ended up doing was adding a Tim Holtz flourish I cut with my Sizzix die cut. I made it look vintage using a heated, bubbled paint technique I took from Luvleescrappin on youtube. Then I added some skeleton bone beads across the center of my lace. The skeleton and beads I found at the 99 cent store (I know, Luckeeeee). The skeleton was the pendant on a Halloween necklace and the bones were the actual necklace (they were 2 to a pack - even luckeeeeeeier). I just cut them apart. The skeleton was too big for my tag so I ripped his legs off (look, he was dead already so cut me some slack). Then I remember the "spider web" stuff I also got at the 99 cent store and just went to town with it on the front of my tag. Of course you can't have spider web without a spider; soooooo I stole one of the plastic spider rings I bought for my son's class goodie bags (check back for a tutorial on those later this month), cut the ring off, glittered with stickles and Martha Stewart black glitter (I looove that glitter). I tucked it in the webbing and added glue underneath. I finished it off with a red bow tie for my skeleton and . . . Ta - da!
The Box:
The box didn't look finished enough just inked up, so I used Glossy Accents on one side on all the bone pieces. I then used my craft knife to cut out the window and put spider webbing inside and stretching across window. I decided to make use of the "extra" legs by adding them as a border around the door, filling in with the loose bones from the necklace. There was a skull at the top of the door, so of course I had to cut a small hole and wedge in a skull bead to finish off the door. The box was finished off by adding some spider webbing to the front (adhering with a few mini glue dots to hold it on) That was it for the box, a little more spider web inside to nestle the tag book in and voila!

Monday, October 3, 2011
Rustic Flower Tutorial
So I am working on a scrapbook of our Grand Canyon and Tombstone road trip and needed a really rustic flower . . . something not flowery, you know? This is what I came up with:
 Still a flower, yet kind of a country western flower if you will . . .I think it will be perfect for the front of my album. I've done a ton of paper bag albums, but with some inspiration from some crafty ladies on youtube (Follow the Paper Trail channel and Luvleescrappin channel) I am doing a paper bag album with a twist. I will post it when I get it finished, but for this flower here's what I did:
I started by die cutting two medium sized flowers out of canvas with my sizzix machine (flower die #654982). I used some Ranger distress inks (walnut and vintage photo) to "dirty" up the canvas a bit. I then edged it using a brown permanent marker. I used the ink a little heavier on the bottom flower for depth. I then used a cream colored paper flower and glimmer misted it with a yellow/gold glimmer mist that I mixed myself (Tim Holtz has a great tutorial for this). Then I used my Ranger distress inks again (patting it on the non-stick mat and then misting with water so I could use a paint brush to apply). I used walnut, vintage photo and black soot (just the edges with the black soot).
Once I had it the look I wanted it didn't seem to be "enough" so I ran it through the Sizzix machine in a Tim Holtz embossing folder (I used the patchwork folder that came in the "Bingo and Patchwork" set) to give it some texture.
The last item was a plastic button I probably pulled off of an old shirt. I used a little Ranger alcohol ink to give it a little color and then I glued them all together and called it FINISHED!
Monday, September 26, 2011
Preview Night is Almost Here!
So, tomorrow night is my first Preview Night at Timeless Treasures . . . yay! Of course I am a bit nervous though. What if no one likes my albums . . . what if no one signs up for my classes . . . what if, what if, what if . . .? So I guess I just need to get over myself and let it be. Here is a sneak peak at my two albums. The first one is entitled "Grunge Princess" and is a mini chipboard album with a crown style edge on the pages. And, since I don't have a girl, the pictures inside are Gidget (of course) until I get more pictures of my brother's little girl (hint, hint Sean). Here it is . . .


So what do you think? Okay, I know no one is reading this blog because I've only given the web address to my brother so far, but maybe some day someone will be looking . . .
My second album this quarter is another chipboard and is called the "Classic Christmas" chipboard album. I wanted to keep it classy looking and not cutesy like so many of the Christmas albums. The birdcage page was really fun to do using the Tim Holtz technique to create a "rusted metal" look with his special embossing powers. The album wasn't quite finished when I took these pictures, so the banner by the birdcage will say "Peace on Earth;" and if you can't see it, in the bird's mouth it's a piece of holly instead of an olive branch (well I thought it was cute!). Okay, here it is . . .

 Soooooo . . .?
If anyone is reading this, hope to see you Tuesday night, September 27th at Timeless Treasures in Rancho Santa Margarita at 6:30 p.m.


So what do you think? Okay, I know no one is reading this blog because I've only given the web address to my brother so far, but maybe some day someone will be looking . . .
My second album this quarter is another chipboard and is called the "Classic Christmas" chipboard album. I wanted to keep it classy looking and not cutesy like so many of the Christmas albums. The birdcage page was really fun to do using the Tim Holtz technique to create a "rusted metal" look with his special embossing powers. The album wasn't quite finished when I took these pictures, so the banner by the birdcage will say "Peace on Earth;" and if you can't see it, in the bird's mouth it's a piece of holly instead of an olive branch (well I thought it was cute!). Okay, here it is . . .


If anyone is reading this, hope to see you Tuesday night, September 27th at Timeless Treasures in Rancho Santa Margarita at 6:30 p.m.
Subscribe to:
Comments (Atom)