Wednesday, October 31, 2012

Twilight Bracelet ~ Amazing Mold Putty DT Post

Okay, I have a friend who is a total Twi-Hard.  With the new movie just around the corner, I wanted to make a bracelet for her (you know which one I mean . . . the one with the carved wolf charm from Jacob and the diamond heart charm from Edward).  I knew I had some faceted glass hearts but that I only had one little carved wolf charm; and well . . . that one is mine - lol.  So I decided to really put Amazing Mold Putty and Casting Resin to the test.  This charm is only about 22mm long and about 10mm tall - it is tiny.  But take a look at this!

I have to say how excited and impressed I am with the Amazing Mold Putty and it's ability to hold even the most minute detail.  I was a little skeptical to try this because of the small size of the wolf charm.  I  thought that this project might be too small for a design team post.  But to be perfectly honest, I really want to show off how well this worked and how much detail the finished product has.

I started with making the mold by mixing your Amazing Mold Putty (equal parts A and B) and kneading it like play-doh until it is a solid medium yellow color.  For this project I used very little product but can see myself using the mold over and over again.


Apply your putty to the item you want to mold and allow the putty to set (if this is your first time using Amazing Mold Putty, please refer to their website for detailed instructions) - click here.


Next, You will mix your Casting Resin (use the link above for detailed instructions) - equal parts A and B. As soon as parts A and B are thoroughly mixed you can begin pouring into your mold (It will turn an opaque milky white (see below) when it is completely hardened (unless you are using the clear resin of course).


Once the resin is completely hardened, pop it out of the mold.  I did have an issue getting the ring right, so I just inserted a jump ring into the back of the resin before it hardened, which I think I like better anyway - it's less noticeable than the large wood ring on the original.


You can't see the detail quite as well before it's painted, but if you look really closely (click on the image to enlarge it) you can see that the mold catches every single nook and cranny in that charm!  I am beyond impressed.  I made a couple to try different color techniques.  In the end I chose the one I colored with alcohol ink, but I think they all came out pretty good; what do you think?


To be honest, I like mine better than the original (the top one is the original).  They look even better in person.  So, for all you Twi-Hards out there (or anyone else who has a one-of-a-kind piece that you want to use more than once). . . just think of the possibilities.

Make sure to check out the Amazing Mold Putty website to sample (or replenish) these Amazing products. Visit their blog for more Amazing projects.

Thanks for stopping in to check out my project.

~ Make Today Count

Wendy

Halloween Class Treats

I'm bummed that I couldn't be in class to watch the kids get their treats, but hope they enjoy them!


Teacher treats:


~ Make Today Count
Wendy

Tuesday, October 30, 2012

Halloween Treat Box ~ Sour Cream Type Containers

Okay, I've been totally busy working on some design team projects (including one for the Robin's Nest and Helmar Blog Hop - Make sure to join us November 3rd to win some fab prizes!), but I wanted to share the treat "boxes" if you will, that I made for my son's third grade class.

I hope you like them:


~ Make Today Count

Wendy

Thursday, October 25, 2012

Robin's Nest and Helmar Blog Hop Coming Up!


Mark your calendars for the Robin's Nest and Helmar Blog Hop for November 3rd - there will be prizes . . . and who can resist prizes . . .?

~  Make Today Count
Wendy

Saturday, October 20, 2012

Cowboy Up Mini Album ~ Robin's Nest DT Project


I created this mini album as an insert to my travel journal from our summer road trip to South Dakota (Deadwood). We had so many pictures from this little photo shoot, I couldn't decide on just one or two. By creating a mini album insert, I was able to use 10 pictures! Here's what I did:

I started with my stash of Robin's Nest Papers and chose the double-sided Cowboy Cardstock (you really need double-sided paper for this to come out finished looking) and double-sided Calamity Jane Roses Cardstock. I don't think I could have found more perfect paper for these pictures if I was to try and create it myself. I love, love, love the cowboy paper and the roses with a touch of glitter is fabulous. The colors are perfect muted tones that really capture the feel of the old west. I also used the Cowboy Stickers which were the perfect finishing touch.

I started with my two sheets of paper and cut the Cowboy Cardstock (link above) to 7"x 12". I scored it 1", 6" and 11" on the long side (this will be the cover). I cut the Calamity Jane Roses Cardstock (link above) to 7" x 9.5" and scored it in the center. I used the 5" strip that was left to cut a piece 4.75" x & 7" I then used the left over scrap of the CJ Roses Cardstock for an extra fold-out piece. Here are the cut pieces:

The next step was to attach the CJ Rose 7" x 9.5" piece to the flap (created by scoring at 1") on the left side of the cover with the fold facing in. This creates a double fold-out and should look like the picture below when open.
The next step is to add the 4.75" x 7" piece of CJ Roses Cardstock to the flap on the right side (flap created by scoring cover at 11"). Now it should look like this with the double fold-out on the left and a single fold-out on the right:

When the double fold-out is opened it should look like this:


The last step to the construction portion of the album is to add the small scrap to the single fold-out on the right side. When both fold-outs are open it should look like this:

This is a top view of the whole album:


The next step is to add your pictures and embellishments which, of course, is the fun part! This paper was so perfect, I didn't have to add much to get that old west feel I was looking for. . . it just sort of came together. Here are some pictures of the finished album:


Thanks for looking at my Cowboy Up Mini Album. Be sure to saddle up and mosey over to the Robin's Nest website to check out the whole line of western paper and embellishments. Check out the Robin's Nest blog to see more fabulous creations from the Robin's Nest Design Team.

~ Make Today Count
Wendy


Sunday, October 14, 2012

Skull Embellishment for Tag Mini Album ~ Amazing Mold Putty DT Post

I was trying to find an embellishment for a Halloween mini tag album I was making for a class at my local scrapbook store and was having no luck at all. I could find stickers (ugh, no please) and skulls that were too large to use for an album, and then it struck me . . . I can make my own! With Amazing Mold Putty, you are not limited to what you can find in a store to use in your scrapbooking, you can totally create an embellishment the exact size you need.


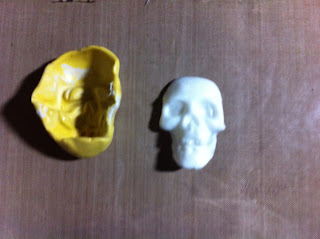
For this skull embellishment, I started with a rather large (and bulbous) skull head from my local craft store. As you can see from the picture, it way too large to use as an embellishment on a scrapbook.


So I just made a mold of the face portion - start by mixing your Amazing Mold Putty (equal parts A and B) and kneading it like play-doh until it is a solid medium yellow color.


Apply your putty to the item you want to mold (my skull face) . . .

Allow the putty to set (if this is your first time using Amazing Mold Putty, please refer to their website for detailed instructions) - click here.
Next, You will mix your Casting Resin (use the link above for detailed instructions) - equal parts A and B. As soon as parts A and B are thoroughly mixed you can begin pouring into your mold (I'm still playing with the other project you see so ignore that one -lol). It will turn an opaque milky white when it is completely hardened (unless you are using the clear resin of course).
Once the resin is completely hardened, pop it out of the mold.

Voila! I now have a flat backed embellishment that can go in a tag or any mini album and won't create too much bulk. Don't you love that you can create something so totally different from what you started with using Amazing Mold Putty and Amazing Casting Resin? I know I do.

Add a little paint and who would ever know you created this little gem yourself?


So have some fun and create something new and unusual for your next scrapbook! Make sure to check out the Amazing Mold Putty website to sample (or replenish) these Amazing products. Visit their blog for more Amazing projects.

Thanks for stopping in to check out my project.

~ Make Today Count

Wendy


Wednesday, October 10, 2012

Yorkie Halloween Costumes

Okay, I totally have to share these!  My brother and I have been trying to "one-up" each other all day with our quick wits and creative ideas for Halloween costumes for my teeny tiny yorkie . . . here's what we came up with:

11.     If we had a conductor baton she could conduct a "Yorkestra" and we could dress her in tails . . . ha ha, get it . . . tails?

10.     Create a mask and snorkel and she can be  . . . yorkeling!  (wait, they get better - promise!);

9.       Give her a colorful striped shirt and suspenders and she can be "York from Ork" . . . nanu nanu?

8.       Make her a faux tin can from cardboard and foil and she can be "York and Beans" . . . lol, I'm cracking myself up here . . .

7.       Give her a banner and some roses and she can be "Miss New York-ie" . . . yes?

6.       Make a bun costume from fabric and batting and she can be a "Pulled York Sandwich"

5.      Print a USPS shirt patch to put on a store bought shirt and she can be a "Postal Terrier"

4.       Cover two pieces of round cardboard in foil and she can be a "York-ie Peppermint Patty"

3.       My brother says to take a picture of her backside and call it "Terrier Derriere"

2.     A lab coat and some evidence  . . . "CSI:  New Yorkie"

1.     The number one (mine of course) is an outfit I've already made so that Gidget and her mini yorkie boyfriend can dress up together (a crown and cloak for him and a princess cone hat and tutu for her - sparkly of course) as  . . . wait for it . . . "The prince and princess of York -ie"

Okay, yeah, way too much time on our hands -yes?   Hope this gave you a chuckle.

~ Make today count
Wendy

Saturday, October 6, 2012

This Treat's a "Shoe In" Halloween Teacher's Gift Robin's Nest DT Post

Hold on to your hat . . . no your broom, or er um I mean your shoes . . . your witchy shoes that is! Take a look at this fabulous teacher gift (or friend gift, or neighbor gift or co-worker gift - you get the picture)


I can't take credit for the idea for this uber cute witch's shoe, I scraplifted this from Carlene the Pink Scrapper - her video tutorial is here:  http://www.youtube.com/watch?v=KHAeeM30sU0&feature=plcp  and the template can be found here:  http://www.skiptomylou.org/2008/10/28/paper-witch-shoes/ (another great blog).

So I started with a template that looks like the one below (a little further down below) and used an embossing stylus to transfer the image onto my paper. But let's back-up a step. As always, the first thing I did was go through my Robin's Nest paper stash and found the PERFECT paper for this project! This paper is called Halloween Swirl. Click on the paper to fly right over the website and pick some up.

Halloween Glitter Swirl Cardstock


After cutting out the template from plain white copy paper and folding it to see how it came together, I new how I wanted to lay it out on my paper. I knew I wanted the top of the shoe (part where toes stick out) to have the swirl with some of the swirl going up the side of the shoe. So I decided to use the corner with the most dense amount of swirls (bottom right in the picture above). I turned my paper upside down and positioned my template so that the tip of the toe went as close to the corner point as I could and taped it down. I then put the two papers on a 12x12 paper pad (bottom side) for my inexpensive embossing table. I traced over the entire template, pressing pretty hard.

When I lifted the template off the paper the lines were visible for cutting out the shoe (just be careful not to cut the score marks (those are the dotted lines). The great thing about doing it this way is that you have already scored every line that you need to fold, making it super easy for this shoe to go together fast! And, on the plus side, Robin's Nest papers are such a nice heavy quality and this one is double sided so you don't even have to line your shoe (the template comes with a liner that I didn't bother with) and talk about saving time . . .whew! I plan to make these for a number of the teacher's at school so the less time involved the better.

Once I glued the shoe together (again, you can access the video tutorial through the link above - but really you won't need it - it's so easy) I knew it needed something more. I played with the idea of a buckle but decided on a rosette like the ones you can buy a die and run through your die cut machine; really, these are soooo simple you don't need the die to make them (and this way they are the exact size you want). What you will need is a score board of some kind (or a lot of patience). Decide first the diameter of the flower you desire, then cut that in half and cut a strip of paper that size (but trim just a bit more off (maybe a 16th of an inch to allow for the hole in the center which takes up space as well - I had to make mine over because the first one was a little too large because I didn't count the hole in the middle). I scored mine every quarter inch all the way down.

Once you've done this, you can bring it around and attach the two ends together.


Next, you will put your thumbs on the top and push down and in towards the middle while allowing the bottom to flatten and flare out (you can find many youtube videos showing how to do this if the written instructions are confusing - if you've never seen it done it can sound daunting).


I use just a small piece of scrap from the paper (oh yeah, for this rosette I used a scrap strip of the back side of the paper I was already using - no waste!) and glue it right to the back. And, since we are not worrying about acid free for this project . . . break out the glue gun - yay!


I added a small glitter circle which I cut from scraps of black Glittered Chipboard and an orange dew drop to give my rosette a finished look (click on pictures below to get some). When it was complete I just added my "treat" for the teacher with a tag and coordinating ribbon and . . . voila . . . teacher gift for Halloween!

Very Black Glitter Chipboard x Flame Dew Drops 1 oz bottle


So. . . what do you think? Leave a comment and let us know what you think. Be sure to check out the Robin's Next website for these and other really fun products.

You can check out the Robin's Nest blog at http://chatteringrobins.blogspot.com/  Thanks for looking at my project.

~ Make Today Count
Wendy

Wednesday, October 3, 2012

Vote for Gidget!


My baby Gidget is entered in the PetSmart Costume Photo Contest (link below)  - Please go vote for her!  You can vote on each of her photos once per day.

http://apps.facebook.com/monstercute/showentry?entryurl=%2Fcontests%2Fshowentry%2F1318458%2Fnull%2F4&fb_page_id=77978885595


If you click on "view all entries by Wendy" you can see her other photos too - I will be posting several - lol.

Thanks for your support!

~ Make Today Count

Wendy